

Why the app ?
I could control the car built in Part 1, through bluetooth, using a geeky apps like BLE Scanner. However, once the car was built, my kids were also interested in playing with it. And BLE Scanner was too complicated for them. I wanted something simple and easy to use.
There were some apps which provided buttons and controls using orientation sensor. Then there were others, which could send full spoken sentences over bluetooth. But none of them was really cutting it. Also, many of these were built some time back and would only work with the old Bluetooth 2.0 standard, missing out on features of the new Bluetooth Low Energy (BLE) 4.0 standard.
In any case, I could not find all the features that I wanted, in a single app which could do it all.
So I decided to build one.
MVP – required features

Since I decided to build my own app, I got a bit aspirational. Taking inspiration form some of the apps that I had seen, I wanted to integrate all of their best features into a single app. I also knew that kids will enjoy it even more if the car can be controlled by just talking to the phone or by using phone as a steering wheel. Following was the MVP that I finalized:
- One Touch connect
- Direction Buttons
- Gyroscopic Steering
- Voice Commands
Objective was to have these features in a clean, easy and intuitive interface.
Once I had the MVP built, I kept on adding more features typically needed if we are controlling a car. I added function keys for things like headlights and horn. And also, the Record-n-Replay feature, to teach the car to perform certain movements and then it can keep repeating it. Further, all of these buttons and functions can be fully customized to suit many other needs or projects. We can add customized voice commands and customize the corresponding codes to be sent over bluetooth. Additionally, for connecting with a single tap, the custom connection parameters can be configured and stored, .
Here is the app in action.
Feature details
Let us now dive into the technical details of major features.
Button control

This is main section of the app where all direction controls reside. With these, the car can be moved in any of the 8 directions. Including the signature moves of Mechanum wheel i.e. sideways and diagonals. In addition, it rotates on a spot like a battle tank.
The way this works is that, when any button is pressed, the BLE code corresponding to that direction is sent to the car over bluetooth. The program in the car uses this BLE code to call a function which activates any/or all of the 4 motors in specific (clockwise/anti-clockwise) pattern. When the button is released, the code corresponding to Stop is sent.
Speed

Speed can also be adjusted from Neutral (0%) to Full Speed (100%). BLE codes 0-9 are reserved for speed.
Sticky Keys

If you do not want to continuously press the key then switch on the “Sticky Key” button. With this, the car will continue in the direction until the same button is pressed again or another direction button is pressed or stop button is pressed.
Gyroscopic Steering wheel mode

Pressing the “Steering Wheel” button activates the gyroscopic control mode. It also deactivates all other direction control buttons.
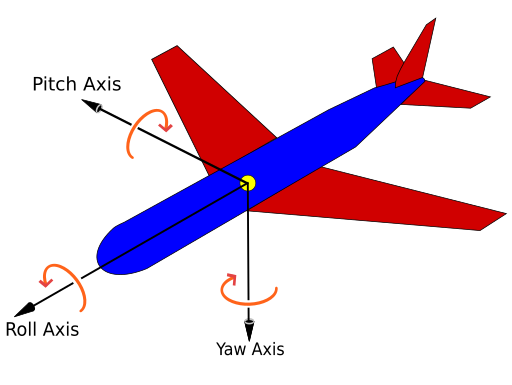
On pressing this button, the gyroscope sensor is activated and records the current orientation values (Roll, Pitch and Yaw) as baseline. Hereafter, if the phone is tilted in any direction over 10-15 degrees, the BLE code corresponding to that direction is sent over bluetooth. The Steering wheel button can be tapped again to come out of this mode.

For the geeks, the roll, pitch and yaw data along with the flag indicating the direction button to be triggered, is displayed in the voice command text box at the bottom.
Bluetooth connection

The connections buttons at the top can be used to connect to a saved device, disconnect, search and select from available devices or go to the settings menu to set default device parameters

Additionally, it also has connection status and displays appropriate messages, which are helpful for debugging connection issues.
Voice or Type commands

This section can be used to give voice commands or even type them. If typed, also click the send button to send it to the car, for voice commands it is done automatically. Custom voice commands can be assigned to all control and function buttons. Many typical voice commands are already preinstalled in the app. A list of all the preinstalled voice commands can be viewed using the “?” button on settings screen.
Function keys

These are basically toggle buttons which can be used for any purpose. Identical BLE code is sent during “toggle on” and “toggle off” action, therefore the program in the car need to use it appropriately. These can be used, for example, to record or “teach” a series of movements to the car and then replay those movements.
Settings Screen
In this screen we can set/see all the details related to connection defaults, custom connection parameters, custom voice commands and corresponding BLE codes. We can save custom settings or restore them to default settings for HM-10 module. Use “?” button to get further help on the app.


Next steps

This app is built using the MIT App Inventor. Considering that I started with the initial iterations that looked like shown here, you can imagine the learnings I gathered along.
The app is called Bluetooth Car Control and available for free download on Google Play Store. This app is built using MIT App Inventor. Visit their website for instructions on how to easily build cool apps https://appinventor.mit.edu/ .
It would be fun to add few more features to the app like joystick control and controls for certain pivoting movements that only a mechanum wheel can do. Later, maybe even try out features like getting data from onboard sensors and camera feed from the car.
Part 3 of this series talks about controlling the car using gesture. For this we will use Arduino Nano 3.3 BLE. This is an extremely powerful, finger sized microcontroller packed with impressive array of sensors. In this we will use the BLE to BLE communication without any user interface.
Thanks for reading.
Here is the link to other parts of this series

Bluetooth RC Car – Mechanum wheel platform (Part 1 of 4)
An Arduino based bluetooth connected car with Mechanum wheels which can move in any direction including sideways and diagonally and can be controlled by voice commands from a smartphone

Bluetooth RC Car – Magic wand (Part 3 of 4)
Control a bluetooth enabled RC car by simply waving this magic wand. Uses Arduino Nano 33 with bluetooth and orientation sensor.

Bluetooth RC Car – Securing with Secret Spell (Part 4 of 4)
Coming soon …..
You might also like

Leave a comment